
Electrical BIM only works when the model reflects installation reality, right down to conduit fill, cable-tray loading, and panel schedules that line up with as-built drawings. In Revit, that means building an information-rich system where parts, circuits, and schedules talk to each other and to the field. Here’s a clear, senior-level playbook you can use on your next project.
Model setup that prevents rework
Start with disciplined families and parameters. For conduits and trays, standardize diameters, materials, and allowable fill. Add shared parameters for “Max Fill %,” “Calculated Fill %,” and “Cable Weight/LF” so your schedules can flag overloads early. Populate panels with well-named circuits, voltage, phase, and demand factors, data your panel schedules can calculate automatically. This is where Architectural BIM Services and Structural BIM Services connect with MEP: coordinated origins, levels, and grids prevent misaligned runs and hanger chaos later.
Conduit fill the right way
Revit won’t enforce NEC fill out of the box; you enforce it with data. Create a conduit schedule filtered by system (power, fire alarm, low-voltage). Add a calculated field for area and cable cross-section to track fill percentage. Use conditional formatting to warn at, say, 80% and hard-stop at your max. When you couple that with BIM coordination services in Navisworks, your 3D clash services catch geometry conflicts while schedules catch capacity. That’s design intent meeting constructability.
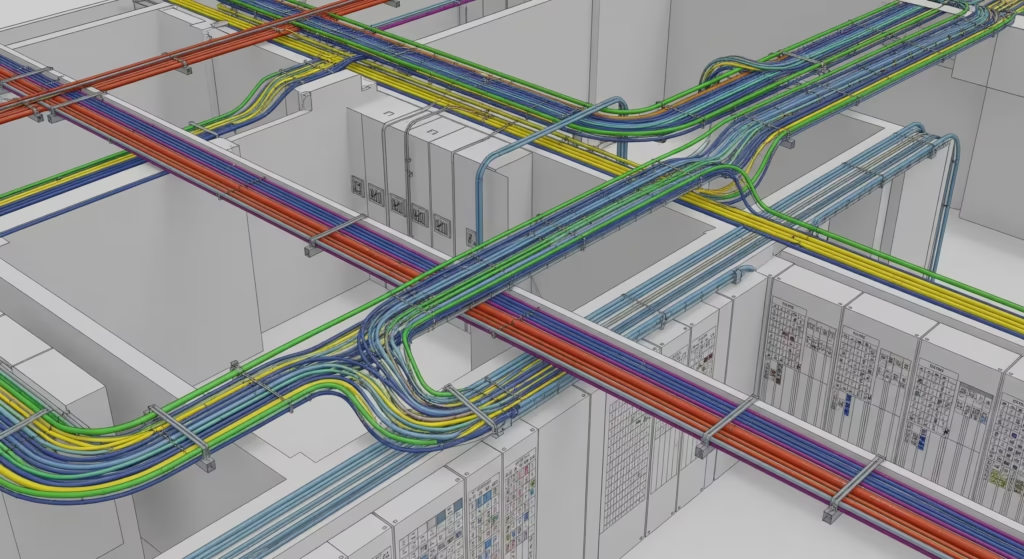
Cable trays that won’t sag your budget
For trays, include width, depth, and load ratings in the family type. Add parameterized tray fill (by % and by total cable weight) and hanger spacing rules of thumb. Your tray schedule should show linear feet, elbows, tees, and supports, producing a credible bill of material for procurement. Because the same data drives shop drawing services and spool drawing packages, prefab can kit supports and bends without guesswork.
Panel schedules that match field labels
Clear circuit naming saves hours in testing and commissioning. Use a consistent tag: [Panel]-[Circuit]-[Load], e.g., “LPA-23-AHU-02.” Align load summaries with distribution one-lines and link panels to rooms/zones so as built services can trace discrepancies instantly. When construction changes, roll updates into the model and regenerate as built drawings before handover.
From model to deliverables
- Shop drawing outputs: plan + 3D isometrics with tag callouts, elevation benchmarks, and support details by spec section.
- Spool drawing outputs: cut lengths, bend angles, fitting counts, and hanger IDs for fabrication.
- Quantity outputs: material takeoff for conduit, tray, and wire pulled, feeding 5D workflows later.
Where supporting services fit
Teams often bundle electrical BIM with architecture drafting, AutoCAD 3D modeling, and architectural rendering services (for client reviews). If you’re searching “drafting services near me,” consider whether local support can actually deliver coordinated BIM Services in India time-zones for overnight turnarounds; many owners choose a hybrid model, local field walks plus centralized modeling.
Quality controls that stick
- Clash coordination (with 3D clash services) at each milestone.
- Fill and load checks on every revision.
- Field-verified updates during install to keep as built services truly accurate.
Bottom line: In Revit, your electrical deliverables are only as good as your parameters and schedules. When conduit fill, tray capacity, and panel data are modeled with intent, and validated through coordination, you hand the field a plan they can install without surprises.